25Live Training – Getting Started
What is 25Live?
25Live is UW’s tri-campus application for reserving classrooms and other physical spaces on campus that provides a quick and easy way to check availability and request space all in one place. This training serves as foundational knowledge for 25Live users.
IMPORTANT NOTE: You may not be able to perform all of the tasks outlined in this training prior to receiving access to 25Live. For this reason, you are only required to read and review this training before requesting access to 25Live. It is strongly encouraged that you revisit this training documentation after you receive access. We recommend using the browser on a desktop computer or laptop to complete the training and also when customizing the dashboard or requesting space on 25Live.
Getting Started
Navigate through this training with these modules:
How to receive access to 25Live
To reserve space on campus within 25Live, you must:
- Log into 25Live to create your account.
- Read through and complete the Getting Started (current page) and Requesting Space trainings.
- Submit the Certificate of Completion (found at the end of Requesting Space training).
After the three steps have been completed, a confirmation email will be sent from the UW Bothell Registrar.
Module 1 – Signing into 25Live
A UW NetID is required to login to 25Live. Cascadia College provides information regarding UW NetIDs for Cascadia College students, staff, and faculty.
- Launch 25Live or copy and paste this link in your browser: 25live.collegenet.com/pro/washington.
- Login with your UW NetID and password.
- Once logged in, you will be taken to your 25Live Dashboard.
Module 2 – Navigate through 25Live
The homepage within 25Live is known as your home dashboard. The home dashboard is where you can view tasks, starred locations, events, or searches. Use the convenient top navigation bar, customize your Dashboard, as well as utilize the Quick Search function directly from the home dashboard.

The top navigation bar is always available. Return to this area to access the main parts of the application, search, and visit parts of 25Live.

The best way to improve your productivity in 25Live is to customize your home dashboard. With smart customization, you can quickly create events, access starred/favorite objects in one click, and quickly access saved searches.
To customize your home dashboard, select the “Customize Dashboard” button at the end of the third column. Use your mouse to drag and drop sections of the dashboard. When completed, select the “Done” button. The following video demonstrates how to customize the dashboard.
The home dashboard in 25Live features an array of customizable widgets, including Quick Search. This widget has options to search for events, locations, and organizations.

Pro Tip: At any point, select the “25Live” tab button in the top navigation bar to go back to your home dashboard.
Using favorites and starred items on the dashboard
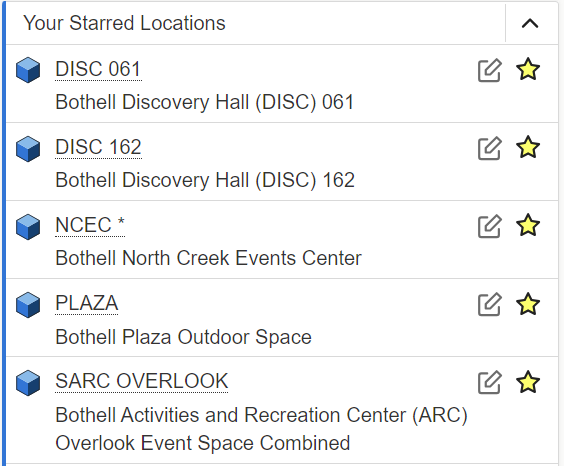
In order to effectively utilize your dashboard, “star” (or mark as a favorite) pertinent locations, events, or searches. This label will add the starred locations/events/searches to your dashboard widgets for ease of access. We recommend you star your most used locations, so those items are easily viewable on your dashboard.
- To find a location to star, select the “Go to Search” button at the top of the page under the top navigation bar.

- On the search page, go to the “Select Object” drop-down menu and select “Locations”. Once selected, enter the name of a location. You can use the name of a building (e.g., UW1 or CC1), meeting area (NCEC), or organization (Cascadia or UWB).

- From the search results, select the star on the left column of the location name to add it to “Your Starred Locations” widget.

- Once the location is starred, it will appear on the home dashboard under “Your Starred Locations” widget.

This process also works for starring events or organizations. Starred events and organizations will appear on the home dashboard respectively. Visit the 25Live Help page for more information on using favorites and starred items.
Back to Top button to go back to the top of the page.Module 3 – Viewing location availability
This module focuses on two primary ways to view location availability.
- If you know WHEN your event should take place — search by availability.
- If you know WHERE your event should take place — search by location.
Search by availability
Searching by availability is useful for those who have a specific date/time in mind and need to see all spaces available at that time. NOTE: Pending events will not appear in the calendar.
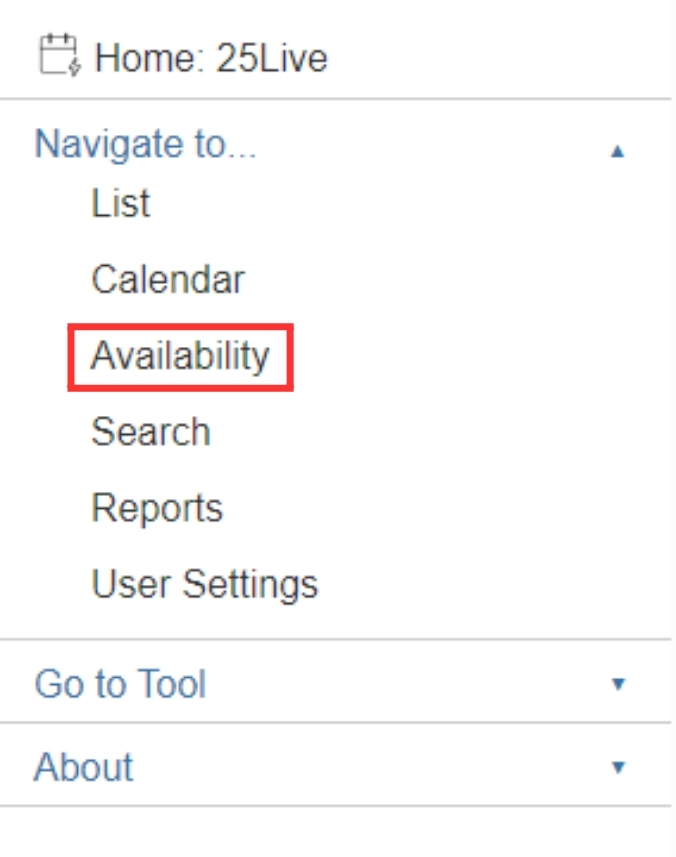
- To find available spaces, select the “More” tab button at the top right corner of the page.

- Under the Navigate to… section, select the “Availability” button from the drop-down menu.

- Select one of the UWB location groups from the drop-down menu to view availability across all locations within that selected group. NOTE: When viewing availability for a group of rooms, you may only view one date at a time.

- Most availability grids default to the current day or week. To change the date you are viewing, select the date (next to the “Include Requested” checkbox) and a calendar will appear.
- Once you have selected the desired date, if you want to know more about that location, select the location from the list. Select the “Details” tab to see the capacity, options, equipment, room layout and photo of the space, etc.
Search by location
Searching by location is useful for those who have a specific location in mind and need to see all upcoming availability for that space. You have two options for searching by location. Use the 25Live dashboard Quick Search feature or the Go to Search feature.
Pro Tip: Using the keyword “Bothell” will populate the full list of UW Bothell campus spaces in the search results for browsing.
Quick search
- On the home dashboard, enter the desired location in the Location field in the Quick Search widget.

- If you know exactly what to search for and you have the building abbreviation (e.g., UW1), room number (e.g., 102) or formal name (e.g., Founders Hall), simply type any of those keywords into the location search fields and press the enter key or select the “Search” button (magnifying glass icon) to populate results.
Go to Search
- Select the “Go to Search” button.

- On the search page, go to the “Select Object” drop-down menu and select “Locations”. Enter location keywords on the search screen and select “Search”.
- Once a desired location is determined, select the location to view detailed availability information. There are two primary tabs for viewing location availability:
- The Availability (Daily) tab will show availability each day for the next 30 days.
- The Availability (Weekly) tab will show a weekly view of the location’s availability.

Note: Since 25Live is a tri-campus system, depending on your level of access, you may see information about spaces located at the Seattle or Tacoma campuses.
Visit the 25Live Help page for more information on searching for events and locations using the Quick Search feature, the Go to Search feature, and to learn more about working with the search results.
Back to Top button to go back to the top of the page.Want to learn more about using 25Live?
Additional information on all topics is available in the CollegeNet knowledgebase by selecting the Help icon in the 25Live interface.

Requesting space using 25Live
Now that you know how to access and log into 25Live and how to view location availability, learn how to request space within 25Live with our Requesting Space training.
